CubicVR (Beta) in SU Podium
CubicVR offers an alternative way to create Panoramas
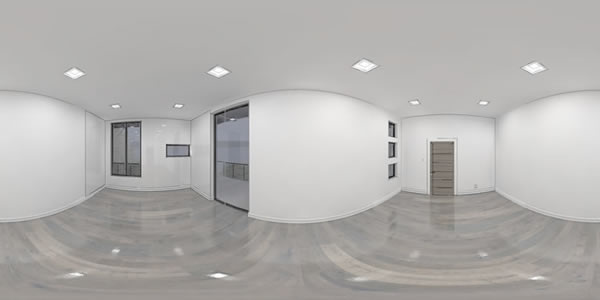
CubicVR (beta) is a SketchUp extensions for SU Podium V2.5.5 users. It renders six square, cubic images and automatically stitches the cubic images into an equirectangular image, ready to be converted to a spherical Panorama. The main benefit for CubicVR will be to create non-photo-realistic (NPR) SketchUp panoramas that can then be overlay-ed on the SU Podium photo-realistic equirectangular image. (See example below).
Click on the above image to view the spherical panorama.
Why and when to use CubicVR (beta)
Here are some reasons to use CubicVR instead of the Panorama option in SU Podium's Options menu.
- NPR Panoramas for line overlay. The only way to create a non-photo-realistic SketchUp panorama image is to use CubicVR. If you want to create panoramic line overlays, CubicVR is the best way to accomplish this.
- Exterior scenes are slightly faster. With the "Podium rendered images" option on, photo-realistic equirectangular of exterior scenes are slightly faster using CubicVR than the normal method.
- Match SketchUp's default camera position with the opening camera position of the spherical panorama. When you open a spherical panorama created by SU Podium, the first camera position you will see is minus 90 degrees to the original SketchUp camera position. 99% of the time, this is not noticed. But if this bothers you, you can use CubicVR's Make Scenes to match the default SketchUp camera angle before rendering to Panorama..
Here are some reasons NOT to use CubicVR (beta) instead of the Panorama option in SU Podium's Options menu.
- Light distribution in interior scenes. Light in the CubicVR generated photo-realistic panorama's is not evenly distributed from one cubic image to another. It's not noticeable for exterior scenes but can be noticeable for interior scenes.
- Does not always work in photo-realistic mode. Sometimes one of the six square cubic images are skipped and not rendered. This will cause the stitching of the six cubic images into a panorama to fail. Usually the best work around is to try again but if this happens more than once, it will be less frustrating to use the Panorama option in SU Podium's Options menu. This is the main reason why we are leaving CubicVR in beta. We will be looking at solving this "misfiring" problem or providing easy work arounds.
Download CubicVR from the Free Bonus Extensions page
- Download CubicVR from the SU Plulgins Free Bonus Extensions page here.
Make sure you download the correct version. The Windows and Mac versions differ. - Install the CubicVR RBZ file from within SketchUp. Read here on how to install .rbz files at the bottom of the Free-Plugins page.
How to use CubicVR
When CubicVR Run button is invoked, CubicVR will create six square images and one reference image. The cubic image sizes are equal and based on the Panorama size that you key in. Some important things to keep in mind.
Checking the "Podium rendered images" off or on will determine if the cubic images will be rendered by SU Podium or simply be exported images of NPR SketchUp.- If you check on "Podium rendered images", CubicVR will use the presets and Environment options you have selected in SU Podium's Option menu. CubicVR will ignore the image size, format and save location settings you have selected in SU Podium's Options.
- When Run button is invoked, all the cubic images will be created. It's difficult to stop this once it has started.
- The cube size will be determined by entering the width of the equirectangular (Panorama)image. If you want a NRP SketchUp overlay panorama image, it must match the size of the photo-realistic EQ image you created with SU Podium.
- The cubic images and the stitched PanoramaOutput image will be saved to a folder of your choice in a uniquely named sub folder.
- Open the stitched Panorama in Podium Image Editor or upload directly to the Panorama Server.
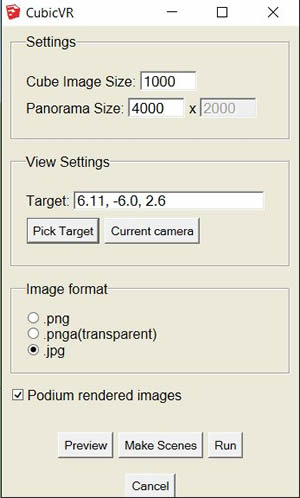
Let's examine some of the options.
- Settings. The settings refers the image size of the final stitched equirectangular image (the panorama). When you enter the width size in the Panorama Image size box, the cube image size will automatically be updated. For example if you enter 5,000 for the pixel width, cube size image box will be updated to read 1,250. That means six rectangular images of 1250 X 1250 will be created. These will be stitched together into a 5,000 X 2,500 equirectangular image. (Keep in mind, CubicVR will ignore image sizes that are in the SU Podium Options menu.)
- View Settings. If you are using Reset Tilt from SU Podium's Tool menu, simply pick the Current Camera.
- Image format is self-explanatory. CubicVR will ignore the image format you choose in SU Podium's Option menu.
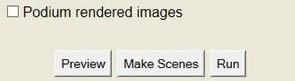
Make sure Podium rendered images is turned off, if you just want to create a SketchUp Panorama line overlay image. If this option is checked on, CubicVR will invoke SU Podium's rendering engine.
Preview will create a fast preview off each cubic image width.
Make Scenes will create six SketchUp scenes of each cubic image width. This option will discussed in depth at a later time but for now, ignore Make Scenes.
Run will invoke CubicVR and will create six square images that have an Aspect Ratio of 1:1 and will have the width size of Cube Image Size.
How to create a line overlay panorama
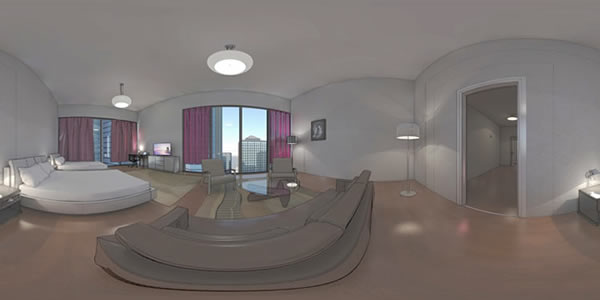
Let's go over the steps to create a line overlay Panorama which will create an effect of sketchy line edges in a spherical Panorama. Our goal will be to create the below image.
Click on the above image to view the spherical panorama.
To follow along with this short tutorial, feel free to download the Studio Scene- Bathroom model. This is a SketchUp 2015 model.
It is advisable to review the Podium Image Editor line overlay tutorial but ignore information about Exporting SketchUp images. CubicVR will save the SketchUp panorama image at the size you have specified in the Panorama Size box.
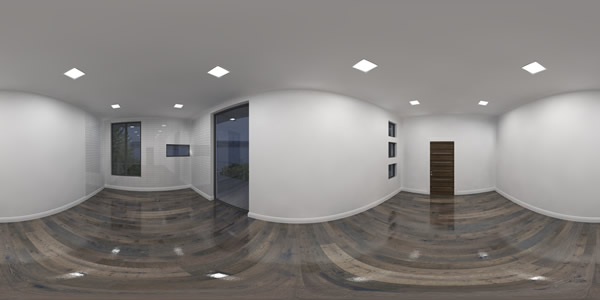
- First use the normal method of rendering this model as a Panorama. Use SU Podium's Options. Pick Panorama and image size of 4,000 X 2,000. Use the 2_interior_bright_high_2.1 preset. You should obtain an EQ image like below:
- From inside SketchUp Extensions menu, open CubicVR.
- Turn off SketchUp shadows and then pick a sketchy line style. This will turn off textures.
- Choose Panorama Size of 4,000. This will automatically update the Cube Image Size to 1,000. You may need to place your cursor in the Cube Image Size box.
- Make sure you use the Podium Tool, Reset Tilt. After that pick Current Camera for View Settings.
- For simplicity sake, choose JPG for image format.
- Make sure that Podium Rendered Image is checked OFF.
- Finally, select Run.
- Select the Folder where the cubic and Panorama images will be saved.
- After a few minutes, you will see this message that CubicVR Done.
- Open Podium Image Editor (PIE) from the SU Podium, Tools menu.
- First open the photo-realistic Studio Scene - Bathroom EQ image.
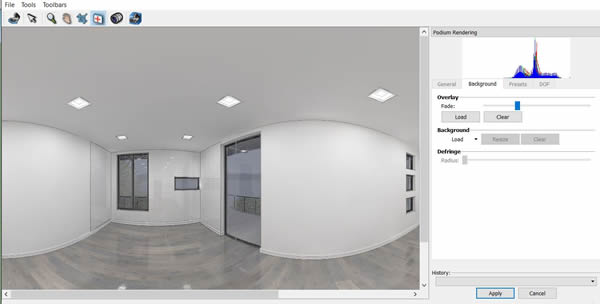
- Next use the Background menu in PIE and Load an Overlay image.
- Select the PanoramaOutput.jpg from the PanoramaOutput_xxx folder you created. Adjust the Fade slider bar. Your PIE scene should look like this.
- Make sure you select Apply and save the new overlay-ed image.
- Now upload your new Panorama to the Panorama Server.