Quick Start: Exterior Rendering
Introduction
Choosing a Preset
Sun and sky light source
Podium Material Properties
Adding backgrounds from Podium Browser
Rendering Panoramas
Summary of tips from this tutorial
Introduction
This quick start tutorial is primarily for customers that are starting to use SU Podium V2.5 and are looking for methods to develop good exterior images. The tutorial will apply the use of presets, sun light and examine Podium material properties, as well as look at some backgrounds from Podium Browser and finally creating a 360 panorama.
This tutorial uses the Barcelona model which is a SketchUp 8 model. This model has five scenes. Feel free to download it.
There are three general steps in creating a good exterior rendered image. One is choosing the best preset. Another is choosing light sources. In this case, since the scene is a daylight scene, the sun is the main light source. The third step is applying good materials to the model and applying Podium material properties to materials. In this model, all the textures have been applied to all the SketchUp faces, so there's no modeling work to do. We just need to use SU Podium and Podium Browser to create photo-realistic images.
Choosing a preset
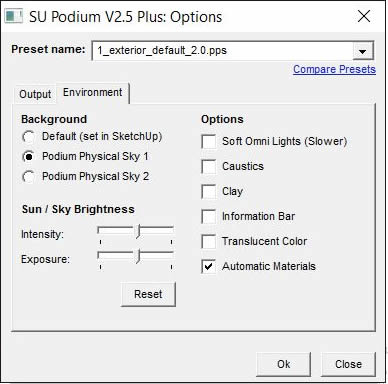
Presets are very important in any rendering. Choosing the correct preset is not difficult. The presets are listed in the Options dialog box. There are many presets to choose from so this may seem confusing. But in reality there are only three categories of presets. One is the default.pps preset, which is the fastest preset but is not configured for exterior or interior scenes. Second type of preset is the Exterior, usually used for exterior or outside scenes with sun light. Third type of preset is the Interior, used for interior or inside scenes.
Reference: Please look at the Preset Comparison page here. This will give you a visual guide in the effect of each preset with various scenes. There is also a very good tutorial guide on choosing presets here. The Choosing Presets tutorial is long but by reading it carefully you will understand how SU Podium works. You will also obtain knowledge of what photon mapping is and the difference between biased and unbiased rendering.
The barcelona model only has exterior day light scenes so we will be using the sun as the main source of light. The other source of light is the sky which produces a low level, consistent ambient light. You could choose either default.pps or an exterior presets for this model. Both presets have fewer light bounces than interior presets. They are ideal for exterior scenes with sun light. Normally, one would use an exterior preset but in this model we will use the default.pps preset for three scenes. We will use exterior_default presets for the panorama scene.
If you find blotches or blemishes in the final rendered scene, use exterior_high presets. This presets has the highest light bounce and is usually the most effective way to remove blemishes. It will also produce very high quality images. However, the render time for _high presets is two to three times longer than _default. So do not use this type of preset for a quick preview.
Choosing the light source: Sun and Sky
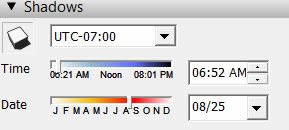
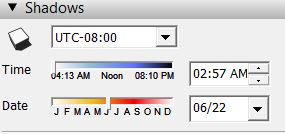
Turn SketchUp Shadows on. This tells Podium to use Podium's sun. In SketchUp chosing time of day, time of year, location and UTC will greatly change the location and direction of the sun light.
Chose physical sky to give turbidity and depth to the sky. Discuss Sun Sky intensity/ brightness briefly.
Choosing materials and properties
There's only one material that we will apply Podium materials properties to. That is the water. This material is called water3-bump3. We will apply reflections of 49%. We want the D,T and R sliders to equal 100%. To create ripple effect on the water, set bumps of 7%.
Tip: If you use the default SketchUp materials that come installed with SketchUp, turn on Automatic Materials located in the Options dialog box. Automatic Materials will automatically apply reflections/ bumps and other properties that the Cadalog team has pre-assigned to the default SketchUp materials.
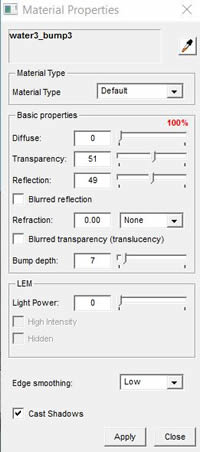
Tip: You can speed up the rendering by setting the Advanced Edge Smoothing for a specific material to low or none. On a large area material such as the water, setting the Advance Edge Smoothing to low does not necessarily result in lower quality rendered image. Because bump maps are applied to the water, the Smoothing can take a long time. So I have set this to Low.
There are no other Podium materials properties applied to the remaining textures. As a default Podium will treat all textures as 100% diffuse and also will recognize any SketchUp transparencies applied.
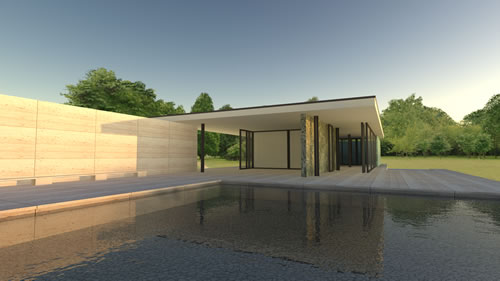
Render the first scene.
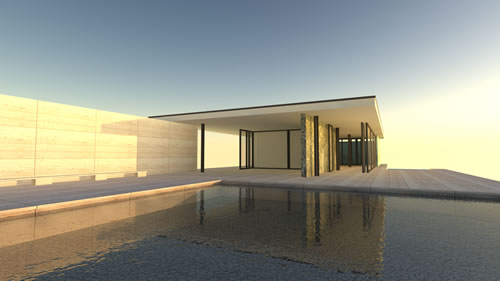
Scene 1
Click on the images to view full resolution
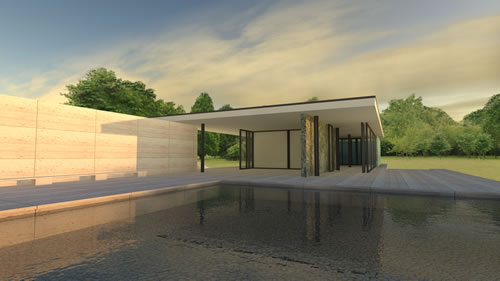
Let's add some backgrounds from Podium Browser. First a tree line. This is an arced 2d image that is part of a component. I can scale this .
Scene 2 - add tree line background from Podium Browser
Click on the images to view full resolution
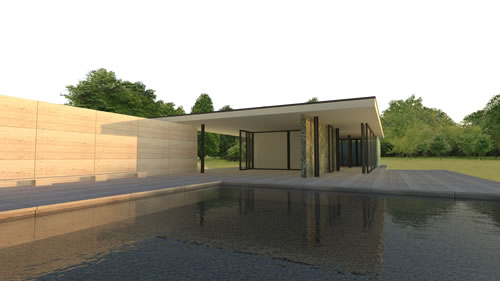
sNext we can add a cloud background. Best to insert these from SketchUp's top view. Move the cloud component into a position that looks good from Scene 1 camera angle.
Scene 3 - add clouds from Podium Browser
Click on the images to view full resolution
In this scene, we will use the .png transparent option. And then using Podiumm Image Editor, add a background to the image.
Scene 4 -transparent
Open the image in PIE by selecting Edit from OOPR. In this case, I choose a city skyline from PIE's background library.
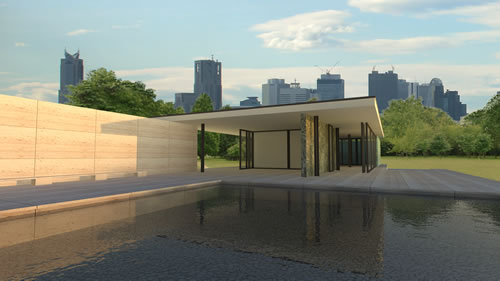
Using PIE to add background
Click on the images to view full resolution

Using Solar North (downloaded from Extension warehouse), you can change the position of the sun by changing the direction of north. In this case, north was changed so east is directly pointed at the camera. Time of year is changed to June 22. UTC is -8. Location is near the Canadian border. Time of day is 3 AM. With the cloud background, this sun position renders a interesting early sun rise.
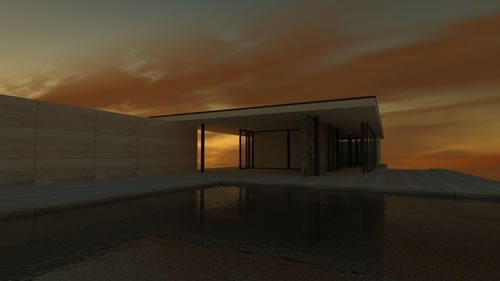
Using solar north to change position of early morning sun rise. Background clouds included.
Click on the images to view full resolution
Panorama - reset tilt. Change image size to 5000 X 2500. Use physical sky 2, exterior_default preset.
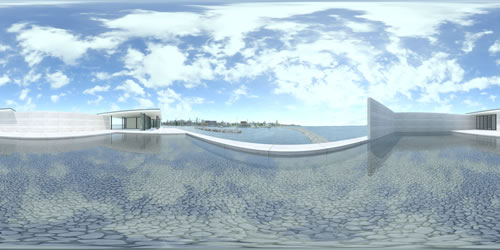
Creating 360 panoramic from a equirectangular image
Click on the images to view the spherical panorama