The SU Walk pull down and tool bar menus
The screen structure of SU Walk is very simple.
The screen is divided into four sections - pull down menu, icon tool bar, work area and status bar.
Back to SU Walk main help page
| Open |
Opens a BWA file format.. BWA file is the SU Walk native file format. It is similar to a project file. You can save a SketchUp model in SU Walk as a .bwa file. Open this format is faster than importing a SketchUp file. |
| Import SketchUp File |
Opens a SketchUp or .skp file. |
| Save |
Saves a file as BWA format. This is like a project file. |
| Save As |
Saves a file as BWA format with a different name. |
| Preferences |
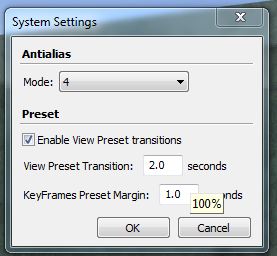
When you select this, the System Settings dialog appears (See below). |
| Anti alias |
Adjusts the details of how the model is displayed. The higher value requires more GPU power but is has greater in display quality. |
| Mode: |
Anti alias settings - 2, 4, 8 or 16. |
| |
4 is set as a default. Greater value makes the display precision higher, but the display speed and the control movement will get slower. |
| Preset |
Controls the playback blank which is created in the animation. |
| View Preset Transition: |
Controls the stop time while moving from one camera view point to the next when creating the Tour or T animation. (Please read about key frame animations in the main help section.) |
| Key Frames Preset Margin: |
Controls how many seconds of stop time to be inserted at the beginning and the end of a key frame animation. (Please read about key frame animations in the main help section.) |
Back to SU Walk main help page
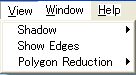
| Shadow |
Switches the light effects. Please see below for more detail. |
| Edge |
Displayes lines at the edges of faces. |
| Polygon Reduction |
Sets the limit of polygons to be shown. This is very useful if you want to reduce the SketchUp model size for quicker animations. |
| Photo realistic Mode |
Turns off or on photo-realistic mode. If you want to create fast animations without reflections or artificial lights, non photo-realistic mode is useful. |
Polygon Reduction
Polygon Reduction is very useful if your SketchUp model is very large and you want to create a quick animation with less quality. Polygon reduction can be very effective with non photo-realistic animations.
1 shows all polygons
5 polygons do not show up unless zoomed in close
1 makes the display and the movement slowest and 5 makes quickest. |
Photo realistic mode
You can switch from photo-realistic to non photo-realistic modes. Non photo-realistic mode is described in the main help section. If you want to create animations that do not need real time reflections or artificial lighting, use non photo-realistic mode.
| Background |
Opens the Background Setting dialog. |
| Presets |
Opens Presets dialog. |
Tool Bar items

Fly Mode - A mode without considering gravity.
There is no collision to any objects. View point height is ignored.
Walk Mode - A mode that simulates walking on the ground.
This considers gravity.This mode detects collision. You can You can Jump by using the space bar. The view point is always located at the view point height except when using jump.
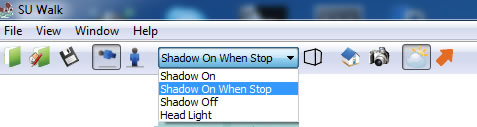
Shadow
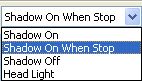
| On |
Always show shadows while moving through the model. This mode will display real-time shadows, reflections and light. |
| On When Stop |
Hides when moving. |
| Off |
Always hides. |
| Head Light |
Changes to the light from the camera. |
Back to SU Walk main help page
Edges

Turn Edges on if you want to display lines at the edge of surfaces.
Move to the original position

Click this icon if you want to move your camera to the original position of the SketchUp model that you imported.
Move to the original position

Click this icon to create a screen shot of your display. Very useful for creating images. However, keep in mind the resolution of the image will be equal to the resolution of your monitor view port. Most monitor's have a DPI resolution of 75 which is not suitable for printing.
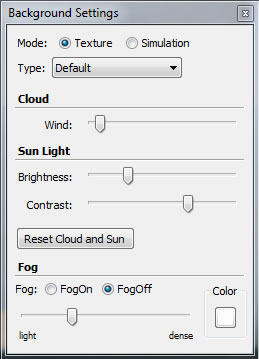
Background panel
|
- Mode Sets the background mode.
You can select between the texture mode and the simulation mode. Depending on which mode you choose, the Type options will change.
- Cloud When Simulation mode is on, you can adjust the wind speed which affects the cloud, snow and rain.
- Sun Light Sets the brightness of the sunlight in the scene.When you change the Type, the Sun Light will also change. The entire scene brightness is adjusted by Brightness and the entire scene contrast is adjusted by Contrast.
- Reset Cloud and Sun Resets the settings.
- Fog Sets to show/hide fog.On-shows and Off- hides the fog.
- Color Sets the color of the fog.
- light-dense Adjusts the density of the fog.
|
|
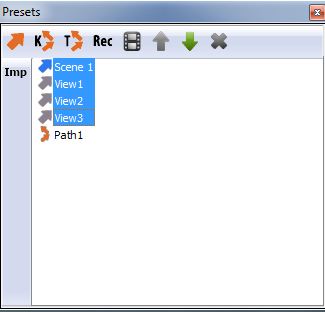
Preset dialog is where you create camera views or key frame animations. You can add a views, create a sequence of views for your walk-thru animation, export a animation path to a video file format and import SU Animate path animations. Please see
From the left,
- add a view point (view point means camera view or key frame animation)
- make the selected view points or scenes into an animation path
- make the selected view points (or scenes) into an continuous playback path
- start/stop recording an animation
- export a movie file of the selected animation path
- move the selected item up the list
- move the selected item down the list
- delete the selected list
The meanings of blue and orange colors
- Blue means a scene that can not be deleted because it was part of the original SketchUp imported model
- Orange means a camera view which can be deleted
There is only one icon color for the path
The IMP symbol on the left of the Presets dialog box refers to importing SU Animate camera paths. If you have created SU Animate, you can import the SU Animate animation path directly without having to import all the SketchUp scenes.
|
| 