|
SU Podium 1.x Tips Page - Table of Contents |
|
Also visit the Tips, Tricks and Tutorials section in the Forum (lots of great stuff there) and the FAQ section on www.suplugins.com Tip #1 - About LEMs Tips #2 How to create masking for your alpha transparent images Podium 1.6 and above supports alpha transparent images which means you can create a 2D alpha transparent PNG image of a tree or car and have the background of the image be transparent. SketchUp supports this already and now Podium 1.6 and above does as well. What this means is you can take 2D photo of trees, plants and people, insert them into SketchUp and use these realistic images inside the Podium render. Using 2D alpha transparent images makes renderings faster and often more realistic than using 3D trees, plants and people. The biggest problem in turning photo images to something useful is the masking. In Photoshop and other image editing programs, masking is the process of deleting unwanted parts of a photo. For example, you need to delete all the background of a tree photo so that when you insert it into SketchUp, the background doesn't come with it. Masking is tricky. Thanks to Jack Bauer who contributed to the Tips and Tricks section of the Podium forum, we found this nifty article about easy ways to mask objects with PhotoShop. Click Here. Tip #3 - Utilities plug-ins for Podium Podium_wizard.rbs This ruby script will examine the current SketchUp model to see how many lights (LEM), reflective faces and omnis are in the 3D model. It will display the results in a dialog box. This utility will give you a clue as to why a particular model is being rendered Podium slower than you expected. The more LEMS, reflective surfaces and Omnis you have, the slower the rendering. Podium_tools.rbs This ruby script will reset all the Podium values in your SketchUp model to zero. This is useful if you find yourself with far too many lights or reflective faces than expected and want to start again without discarding the model. When you invoke this utility, it will rid the current SketchUp model of all Podium properties. The utility will not do anything to SketchUp geometry or groups except delete the Podium reflection and light values. So you can start again from scratch. How to install the utilities. Both Podium_wizard.rbs and Podium_tools.rbs are ruby scripts. Download them from the Registered User page into your \\Program files\\Google\Google Sketchup 6\\plugins folder. Once you do that and open SketchUp, you can access them from the SketchUp plugins menu. Podium Light Fixture Podium Light Fixture program is a quick way of getting a lot of omni lights into your model without having to do to much. Once installed, the light fixture program is accessed from the SketchUp plugins menu. The user interface is a web dialog box much like SketchUp's own material browser. Find the light fixtures you want to use from the four categories and simple drag and drop them into your model. One nice thing is that the omni light groups have already been placed in the light fixtures and default light values have been assigned. So all that is required is rendering the scene. Tip #4 - An important tip about omni groups in the light fixtures You may find that you want some light fixtures to be brighter. There is an easy way to do this without open and closing groups inside the light fixtures components. Use SketchUp's outliner. The steps are as follows:
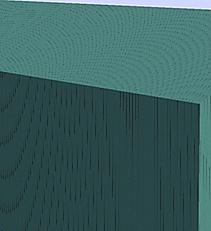
The Podium light fixture program does require you to have a full version of Podium. However, if you are using the free version there is a smaller sample Podium light fixture plugin that you can download from the registered user page. Tip #5 - Imported images don't get rendered A common complaint that is heard is that JPG textures that are imported into SketchUp do not render in Podium. There are two method of importing JPG images into SketchUp. One is to import as a texture. You then apply the image to a face. If you imported JPG files as textures you should have no problem rendering them in Podium. The other method of importing is importing JPG as an image. If you choose this method, you must exploded the image after you have imported it. Then Podium can render it. Tip #6 - Podium shadows do not match SketchUp shadow position This is a know bug. There are a couple of ways to deal with it. First way - Make sure all layers are displayed and that no objects are hidden, use Ctrl-A to select all, then copy and paste the objects into a new model.This almost always fixes the problem. Tip#7 - Dealing with swirl textures-moire effect Textures and geometry that have a lot of "lines" that are close together often appear in SketchUp on your screen as circular or swirl patterns often referred to as the moire effect. As you might expect, if you render these models, the swirl patterns show up in the rendered image. Below is an example of an image with a SketchUp roofing texture that has a lot of close straight lines. The image was originally rendered at 640 X 480 at 100% quality and smoothness. You can see the circular patterns did not go away.
You can deal with this problem in a couple of ways: Easiest (but not always the best quality) is to increase the render size to the maximum. Put the quality and smooth slider all the way to the right (100%) and render. Then when the rendered image is done, reduce it's size in an image editor. The below image is an example.
The surest way to get rid of the circular patterns is to use the noisy settings.xml from the presets. This will take the longest to render but you results will be very good. See below.
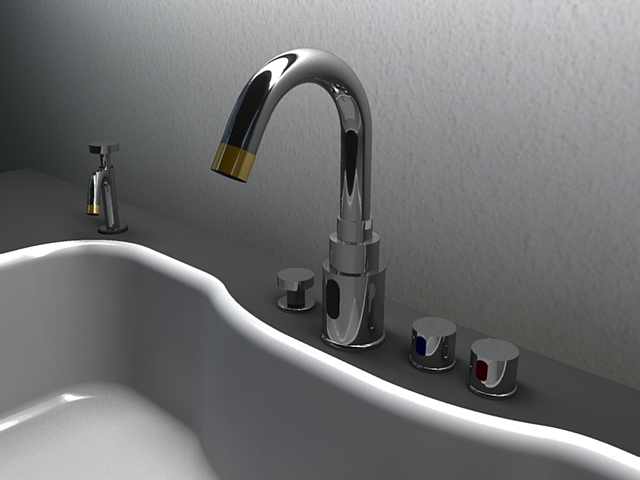
Tip #8 - Creating stainless steel or chrome effect You can create impressive stainless steel or chrome effect in your Podium renderings by using any gray color and assigning 100% reflection value to the gray surface. In the following example, a light gray color was applied to the faces of the faucet in the SketchUp model. (Model was imported from 3D Warehouse.) Then100% reflection value was assigned to each gray face. In this particular case,a LEM light was used above the sink to give an even source of light.
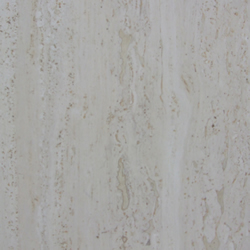
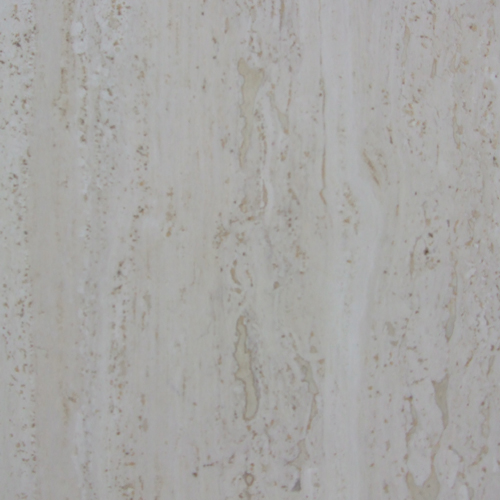
This month's texture (e-news June 9, 2008) is from an photo of a concrete texture that is seen often in Japan. The photo was taken at the Yokohama Grand Inter Continental hotel and convention center. Resolution was then reduced to 500 X 500. Click Here to download the texture. Tip #10 - Textures assigned to Groups do not render well If you assign textures to a group instead of individual faces in the group, Podium may or may not render the group's textures well. To be safe, apply textures to individual faces instead of groups. A quick fix to this "problem" is to explode the group and the immediately group the highlighted faces again. What happens in that process is that SketchUp will apply the group textures to all the faces in the group. When you "re-group" the exploded group, each face will have the group texture applied to it. This will save you the time of having to apply textures to every face in your group. Tip #11 - Podium 1.5 does not support textures that have colors altered in SketchUp What does this mean? If you alter the color of a SketchUp native texture (an .skm file), Podium will render it as the original, unaltered texture. Every SketchUp texture (.skm file) is a compressed JPG texture image. If you alter the color of the SketchUp texture, Podium is fooled and thinks the altered texture is the original unaltered texture. The way to deal with this is to save the SketchUp texture as a JPG and then alter the JPG in your favorite image editing program. Then rename the altered JPG image and import it as a texture into SketchUp. Then save the imported JPG as a .skm file in one of your SketchUp material folders. Here is how you convert .skm files to JPGs. Go to the Material Browser. Click on In Model. Find your material. Right click on it and see the context menu. There's an option to Export Texture. This will let you save it as JPG. Once it is in JPG format, editing the color of the texture will result in better quality then if you were to do it in SketchUp. Rename your new JPG file and import it back into SketchUp as a texture. You can then save it as a .skm (SketchUp material) First paint it to a face. Go to Material Browser. Click on In Model. Find the image/ texture and context menu and click on Save. Note: Podium 1.6 recognizes altered SketchUp native textures and will render them properly. So this tip is obsolete for Podium 1.6. However,the quality of the texture will probably be better if the color is edited in an image editor rather than inside SketchUp. Tip #12 - Back side faces don't render sometimes If you are getting unexpected results with texture renderings, chances are the issue is your texture is painted to the back side of a face and the back side is exposed. With Podium 1.5 and 1.6, the problem where back side faces could not be rendered was solved. However, there are some textures that are exceptions to this solution. How to solve? If you have weird looking textures in your rendered image, use SketchUp to see if the textured face in questions is front or back side. If it is back side, reverse the face and reapply the textures to the front side of the face. Sound simple? How can you tell which face is front side and which is back side? There are a couple of ways to find out.
SketchUp 6 and 7 has a nice tool that will turn off textures and display only the monochrome color of all the faces in the model. In SketchUp the normal or front side of a face is a light tan color and the back side is a darker, usually blue color. Using the monochrome icon in the Face Style tool bar, you can see which face is blue or back side. When you find the blue or back side faces, right click on them and use the Reverse Face option. You will have to reapply the texture to the front side face. The other method is to right click on the face and pick Entity Info. You will see two image panes in the Entity Info box. The right side is the front side. The left is the back side. Which side is the texture on? Tip #13 -Installing for Windows 64 bit computers Trouble installing on a Windows 64 bit computer? Please go to the FAQ Install section and read #10 on what to be aware with Windows 64 Program Files folder names. Click here. Tip #14 - Omni lights with no shadows Do you find a situation where you do not want your omni lights to cast any shadows? There is an undocumented way to "kill" omni light shadows. This method will only work if your omni groups have colors applied. Here is the method:
Tip #15 - Black and White.xml preset Some Podium users have asked for a feature that will produce alpha separation for the background of a rendered image. That way, the background can be used as a mask in Photoshop so other sky images can be added easily. Podium does not have that feature yet but Sepo (Forum Master and preset developer) has created a Black and White.xml preset. You can download this preset from the Registered User page on www.suplugins.com. Download, unzip and add this preset to the Plugins--Podium--Preset folder. Use it to create Black and White rendered images. The SketchUp geometry will render black and the background color will render white. Using both the rendered image and the black and white image, you can create two layers in Photoshop. One layer will contain the black and white image and be used for masking the background. The other layer will contain the rendered image. After the background layer has been inverted and used as a mask, you can import a sky image into Photoshop. Place the sky image on a layer behind the rendered image that has the applied layer mask. A more detailed tutorial regarding this subject will be posted soon. Tip #16 - White-out and solutions With Podium 1.6 (and above) and using the default.xml preset, the sun and omni lights are set brighter than they were with Podium 1.5 and earlier versions. Sometimes an exterior rendering with concrete or asphalt textures will appear glaringly white giving a white-out effect. There are several ways to deal with this: Tip #17 - Crashes and possible solutions A - Model size. A common reason for crashes during the rendering process is - the size of the model and/or the size of the resolution image is too much for your computer to handle. There are a combination of variables to consider but the more faces, components, textures you have in the SketchUp model, the more computing power you will need to render the model. If you are curious to know what your model size is, go to SketchUp's Model Info and click on Statistics. Then use the Podium Wizard to see how many lights, omnis and reflective faces you have. There is no rule of how many faces, components, textures a model can have before rendering will cause a crash. However, the more CPU cores (dual/ quad), the faster the CPU and the more graphic memory you have, the better. Tip #18 - Problem textures from 3DW If you are using 3D Warehouse to find components and textures for your model, you may have run into the following scenario: You render the model and the rendering looks bizarre. Large chunks of the model do not appear in the rendered image. What's up with that? Before you start to curse Podium, there is a solutions for this. Tip #19 - Subtleties of omni lights - James Deely Note: James Deely is an Western Washington University engineering student and has been working at Cadalog, Inc. for two years as a support person and product tester. He is responsible for the production of the Light Fixture Library and has been working closely with omni lights for over one year. There are many ways to utilize and control omni lights. Omni lights can be used by themselves to evenly light an area. Omnis can also be used to create realistic light fixture models like the ones offered in the Light Fixture library available in the Registered User area. If you are not familiar with omni lights yet, skip these tips and read the Help pages on omni lights. Then come back. Just as a refresher, an omni light is a point light. A point light emits light from a center point. The brightest area is in the center of the omni light and the light fades as it radiates out. The way Podium recognizes an omni light is by creating a group and assigning a light value to that group. When a group is created in SketchUp, a bounding box surrounds the group. An omni light emits light from the center of the bounding box of the group. How the omni light looks when rendered is determined by several variables including, group size, group material, material or color opacity and the surrounding environment. Omni group size will determine how large the omni will appear in the render. The shape of the geometry in the group does not directly affect how an omni light renders. The shape of the geometry will ultimately decide the size of the omni group bounding box. SketchUp colors can be applied to a group with a light value, resulting in a colored omni light. If you don't apply a color, the omni light will illuminate as pure white light. Color can affect the intensity of the light emitted from the omni. An example shown below is an omni light with no colors assigned to it, compared to the medium gray color (Color_005 in SketchUp Material Library). Both omnis were set to a light value of 50. In the third image, the same omni group was given a dark blue color. Color can also determine how intense a "burn out" effect on the surrounding faces is from the omni light. 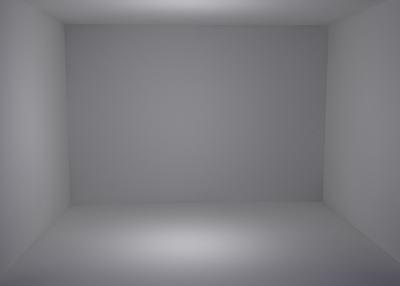
Above: No color omni light with light value set to 50 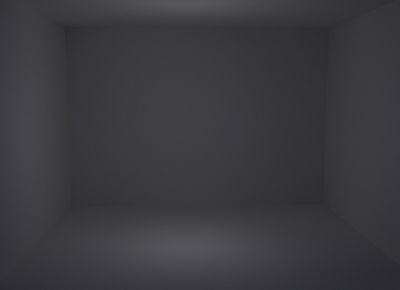
Above: Color_005 omni light 
Above: Dark blue color assigned to the omni group Lowering the opacity of a color to zero after applying it to an omni group will set the omni to cast NO shadows!!However, in SketchUp you must assign a color to the omni group to edit the color's opacity. If you have no color to the omni group, you can not change the opacity level. The two image below illustrate shadows and no shadows. The first image has an omni group with no color (pure white effect) and a light value of 50. The second image shows what happens if opacity of a light gray color of the omni group is set to zero. Objects blocking light from the omni no longer cast shadows. It should be noted that this feature is either on or off. You must set the opacity to zero to have no light shadows. 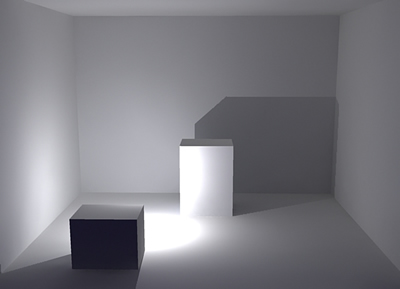
Above: Opacity of omni color set above zero or no colors assigned produces shadows. 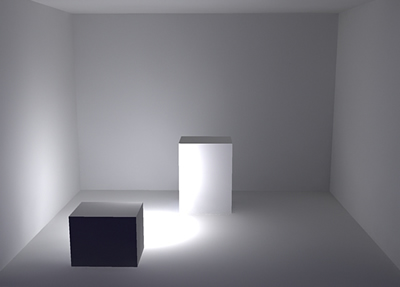
Above: Opacity of omni group's color set to zero (notice there are no shadows produced by the omni light). Environment is one of the biggest factors in using omni lights. The proximity of omni lights to a face will determine if the omni light has a ‘burn out’ effect on the face. If you have an omni light in a room with colors, the light will take on characteristics of those colors. This is similar to a real world environment where illumination from a white light in a yellow room appears to be yellow. For example, in the image below an omni light that has no color assigned to it has a light value of 50 and is placed close to a yellow wall. As you can see, only the face close to the omni was assigned a yellow material. The other faces for the walls, floor and ceiling have no color. 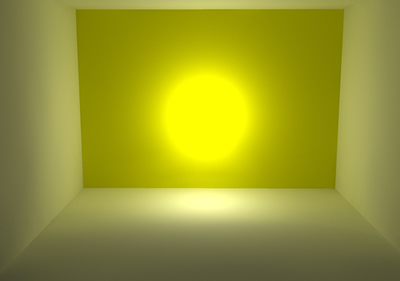
Above: No color omni light in front of a yellow wall. Another environment for omni lights is light fixtures. Omni lights can be put into light fixtures and all of the variables described above, in those fixtures will affect how an omni light renders. In the below example, 4 omni lights are placed in the light fixture. There is one omni light inside the fixture behind a low opacity face to diffuse the omni light. The walls of the fixture behind the diffuser, were given a pure white color to help reflect more light. 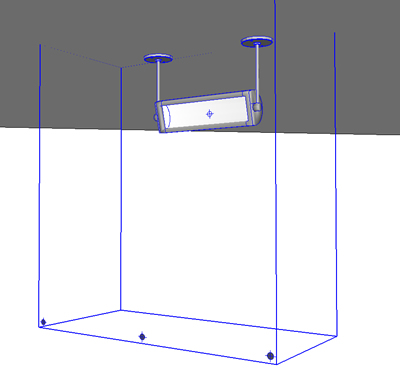
Above: Screen shot from SketchUp showing the setup of the 4 omni lights within the fixture. By comparing the two images below, a subtle difference can be seen in the amount of light that illuminates from the fixture. 
Above: Low opacity white face used as a diffuser. Below: No diffuser used. 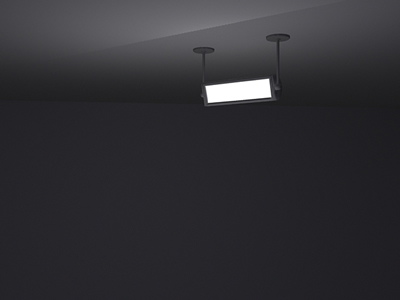
The other three lights that make up this fixture have their opacity set to zero. Setting the opacity of multiple omnis to zero will get rid of multiple shadows. In the image below, multiple shadows can be seen when the three omni lights do not have the opacity set to zero. 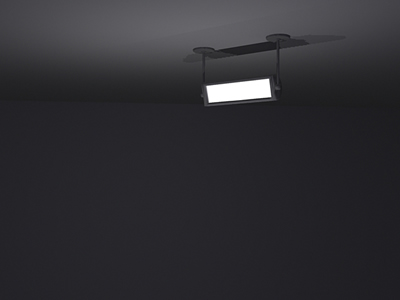
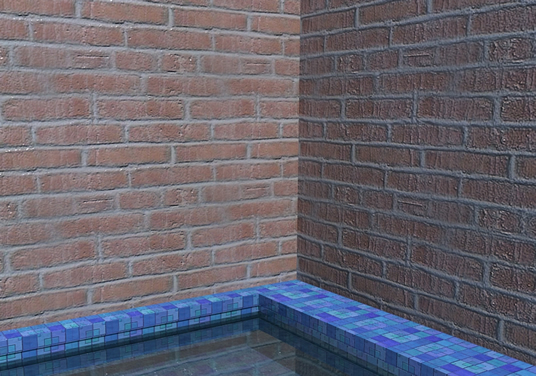
Above: Shadows from from the three exterior omnis that have more than zero opacity. The four omnis in this fixture were given a medium gray color. The omni behind the diffuser and inside the fixture was set to a light value of 1 and had a non-zero opacity in order to cast shadows. The diffuser color was a pure white with the opacity set to 84. The three exterior omni lights were given light values of 10. Tip #20 - Getting ready to print Podium's image "resolution" settings are based on pixel dimensions such as 800 X 600 or 1920 X 1080. Podium allows for pixel dimensions that are greater than most video monitor sizes such as 2 times Viewport resolution and 4,076 X 3,304 pixels. Why do we offer higher pixel dimensions than what most monitors can handle. Among other things, for printing. The higher the pixel size image you have, the greater the document size and document resolution you can print to. When it comes time to print your image, there are some calculations to be made and it can be confusing. Keep in mind that Podium does not have any print capabilities. The JPG or PNG file generated by Podium will need to be printed from an image editing program such as Photoshop, Fireworks or lower cost alternatives. The one feature you will need from your image editor is the ability to change the print size dimensions and the Pixels or Dots per Inch. There are two terms often used in printing and that is PPI and DPI. They are often used interchangeably although technically they have different meanings. The default resolution in Pixels Per Inch (PPI) for JPG/ PNG generated for a computer screen is 72. Images on a monitor will look good at 72 PPI but if you print on paper at 72 PPI it will look like low resolution. Open a Podium generated JPG in PhotoShop or Fireworks and look at the image size. If you opened a 1200 X 700 image in Photoshop, you would see the document resolution is 72 Pixels/Inch and the default print size is 16.667 X 9.694 inches. If you were to print at these dimensions, the document would look poor. To get better print results, you need to increase the document resolution by increasing the PPI. Turn Resample Image option off and increasing the PPI to 360. Now the document size is approximately 4 X 2 inches. Wow!! That's small. But that means if you want to print an image that has a pixel size of 1200 X 700 on paper, it would have to be about 4 X 2 inches to look good. Now open an image in Photoshop (or your favorite image editor) that is 3076 X 2304 pixels. Turn Resample Image option off and increase the Pixels/ Inch to 300. You can print this at 10.253 X 7.68 inches and it will look good. As you can see, the higher the pixel size of the Podium image, the more document size and print resolution options you have. Printers use DPI measurements such as 300 DPI. Although we often equate PPI to DPI, DPI is a print term and is the number of dots of ink a printer can place per inch. Most often your printer's DPI is set to some number like 300 or 600. The main thing to consider is the higher the document resolution measured in Pixels/Inch, the better your print will look. There is a great article related to this here - http://photo.net/learn/resize/. Also, if you are confused about inch sizes and want to translate to MM take a look at this paper size calculator web page - http://www.dpandi.com/paper/index.html. Another useful image size/ paper size calculator web page is here - http://auctionrepair.com/pixels.html. Here is a great tip that came from the Podium user forum. This tip is in regards to bumpmaps. You can change directions of a bumpmap by reversing and exposing a face, applying the same bumpmap texture from your normal side face to the reversed side face. Then rendering. The below image is a good example. Notice on the left side, the space between the bricks looks inverted. This face has been reversed. On the right side, the normal side of the face is exposed.
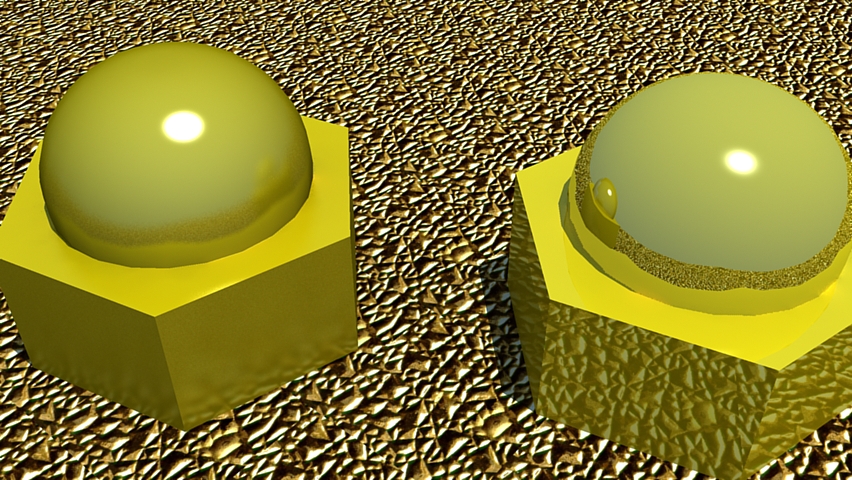
Tip #22 Blurred Reflections in 1.7 Podium 1.7 has a great new feature called Blurred Reflection. The best way to show you how this works is to compare two objects in a rendered image. See the image below. The object on the right has normal Podium reflections. The dome surface has 100% normal reflections. The object on the right is using all blurred reflection. The ground face has no reflections. You can see both objects are reflecting the sun and surroundings. But there is a big difference in how the reflections are rendered.
Some Windows customers have been reporting, first time renderings with Podium create nothing but blue preview images. If this is happening to you AND your computer is on a network that is administered strictly by the IT department, the problem maybe the lack of a "textures" folder in the Podium directory. Podium will create a folder in the Podium directory called "textures" upon rendering the first model that has textures in it. If this folder does not get created, you will see nothing but a Blue preview screen for your rendered image. Most likely, your computer has certain restrictions on it and Podium is unable to create this important "textures" folder. If you suspect that this may be the problem, go to \\program files (if you are using Windows 64 this folder will be named program files (x86))\\google\\google sketchup 7 (or 6)\\plugins\\podium\\ and see if there is a textures folder. If there is not you will need to create a "textures" folder in the Podium directory. We recently held a hardware shoot-out of sorts in the Cadalog, Inc. office. We had purchased both a Mac Pro Desktop and a custom built Windows Vista Intel I7 and ran some Podium 1.7 tests on them. Here are the specs of the hardware:
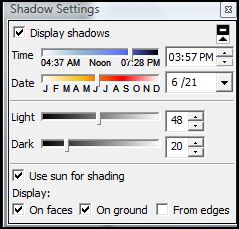
Mac lovers - you might cry "fowl" as the Windows machine looks more powerful but apparently the Xeon processor also has hyper threading and the big advantage of the Mac Pro is that it can utilize all 8 GB or Ram where as SketchUp and Podium running on Windows will not use over 4 GB of Ram. The first test was rendering the Basic Tutorial1 After SketchUp file from the Video page on www.suplugins.com. This model has almost every Podium feature applied. It was rendered at maximum quality and smoothness at 4076 X 3304 Pixels. As expected, the Windows machine performed fastest. It rendered the model in 13 minutes and 13 seconds (13m13s). The Mac Pro took 19m39s. The next test was done with Render All. As you may know, Windows machines have a difficult time rendering more than 20 or 30 scenes in a batch. We were hoping the i7 would have no problems. We were wrong. We took the podium-interior-animation-with-scenes.skp file downloaded from the Video web page and applied it. This file has 178 scenes. The Mac Pro had no problem render all 178 scenes at 800 X 600!! Even the i7 stopped at 40 scenes.:-( Next test was performed on really problem models that would not render previously on any machine Windows or Mac. We focused on one model that had 2,750,000 faces. Mac Pro -- YES Windows i7 -- NO. Conclusion: Both machines are killer. The Windows i7 975 is the faster of the two and in most cases, other than Render All, performs better and is less expensive ($2,800 fully configured) than the Mac Pro ($3,400). But if you are using Render All for animations and have more than 40 scenes, the Mac Pro is a computer that will work. It also appears to be able to render next to impossible models. There was one model with over 3,500,000 faces that it would not render though. Soft shadows are shadows that become more blurry (softer), the more distant two objects are from each other. For example, the shadow of the top of a fence post is more blurry than the bottom because it is further away from the ground than the bottom. Podium has soft shadows from the sun light. But be aware!! Soft shadows is an undocumented feature. The quality of soft shadows depends very much on quality settings and resolution size. In many cases, you may not want to use soft shadows. Soft shadows from the sun are turned on by clicking on "Use sun for shading" option in the Shadows Setting dialog box.
Soft shadows will not look good using Podium's Default preset. It is advised to use Quality or Noisy presets with as much smoothness/ quality settings and as high of a resolution as possible. The quality of soft shadows will depend on other factors such as the brightness of sun light, skylight and the texture the shadow is projected on. The two images below demonstrate soft shadows quality. If you do not want this feature, make sure "Use sun for shading" is turned off.
|


