A. Trouble ShootingI. Trouble Shooting Install V2.x Plus1. What's the difference between V2 Plus and V2.5 Plus?2. After installing, SU Podium is not in my SketchUp extensions menu
A. SU Podium version does not match your SketchUp version. B. Windows: You installed a SU Podium 64 bit version on a 32 bit Win OS. C. You do not have a user account that has administrative permissions. D. Third party Ruby script organizers are known to block SU Podium from launching A. SU Podium version does not match the SketchUp version There are specific SU Podium versions for each SketchUp version. Make sure you download the correct version that matches your SketchUp version for the Mac. If you downloaded the wrong version SU Podium V2.x, Podium will not appear in your SketchUp extensions menu. Click here to be directed to the install file that matches your SketchUp version. Make sure you download the SketchUp 8 version V2 Plus. The default install location for SU Podium V2 or V2 Plus for SketchUp 8 is \program files (x86)\google\google SketchUp 8\plugins\. Make sure the destination folder in the install read c:\program files (x86)\google\google SketchUp 8\plugins\
4. Rare case - SketchUp is not in the C:\program files\ or C:\program files (x86) folder.
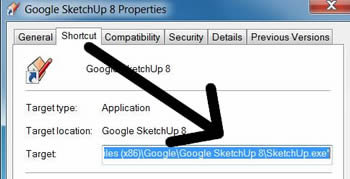
You may find that for some reason on your Windows computer, SketchUp was not installed in c:\program files or \program files (x86) folder. To check to see where your sketchup.exe file is located, go to your Desktop, right click on the SketchUp icon, choose Properties from the context menu and select Shortcuts to see where sketchup.exe is located. If it is not in the \program files (x86)\google\google sketchUp \ folder, reinstall SketchUp so that it gets installed in the default location. You may need to consult with your IT person regarding this. B. Windows 64 or 32 bit versions. Make sure you are installing the correct Windows version. V2.5 Plus for SketchUp 2014/ 2015 supports both Win 64 bit and Win 32 on Windows 7 and 8. Make sure you do not install the 64 bit version for 32 bit Windows. SU Podium will install but when you load SketchUp you will see errors and/ or the SketchUp menu will not get loaded. With SketchUp 2015, Trimble offers a 64 bit and 32 bit version of SketchUp 2015. Make sure you match the correct V2.5 Plus version with your SketchUp 2015 version.
3. There is no extensions menu in my SketchUp pull down menus
II. I downloaded the wrong version. What should I do?Click Here for SU Podium V2.x to download the correct version. You will need your V2 license code. Click Here for SU Podium V2.5 Plus to download the correct version. You will need your V2.5 license code.III. Nothing happens, OOPR crashing, Process Scenes quits, etc.
I V. Podium Browser FAQ page
V. Other issues
Windows 64 bit users: We strongly recommend that if you are using SketchUp 2014 or SketchUp 2015, that you use SU Podium V2.5 Plus. Mac Users: We strongly recommend that if you are using SketchUp 2015 or 2014, that you use SU Podium V2.5 Plus. If you have a full license of SU Podium V2.x, make sure you re-start SketchUp after activating your license to get out of trial mode.
a. If you purchased your SU Podium V2 or Podium Browser license from www.suplugins.com, look for the e-mail receipt that was sent to you. This has your license information. b. If you purchased from www.suplugins.com's Webstore, go to webstore.cadaloginc.com. If you created an account with a user name and password, login to your account. Your license information is in your account. c. If you have SU Podium V2 running, go to the License option in the SU Podium V2 pull down. This will display your license.
If this is happening to you, a temporary solution is to turn off or disable the Anti-Virus program while downloading SU Podium install program. Then after successfully downloading and installing SU Podium, add an exception to the Anti-Virus or any other suspect anti-virus program. The exceptions you want to add are OOPR.exe, PodiumImageEditor.exe and the web site - http://www.suplugins.com/version2.php. An example of adding exceptions is here here.
B. Known bugs and common questions
Known bugs1.Flipped Components with the same texture bug and render black or distorted has been fixed in V2.5.x Plus.If you assign texture to a component and then flip that component, SU Podium V2 or V2 Plus will render the component's textures black or in a distorted fashion. The solution to this bug is to explode one or all of the flipped components. You can turn the exploded geometry back into a component after exploding it. We recommend that for now, use Copy+Rotate SketchUp command instead of the context menu Flip command.
2. Hidden LEM cast backwards shadows of their own light
3. Omni Light decimal value is rounded off to the nearest whole number in PLS dialog
4. Picking color in Podium light system for the Mac
5. Creating .skm textures with Podium properties will cause SketchUp to crash
6. Mac 64 bit and TIFF crash - this has been fixed in V2.5 Plus.
7. Generate bug - fixed in V2.5 Plus
8. Multi-byte named SketchUp files will not open directly from Edit (PIE) in OOPR
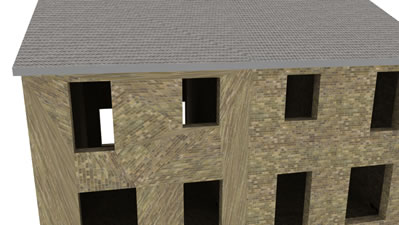
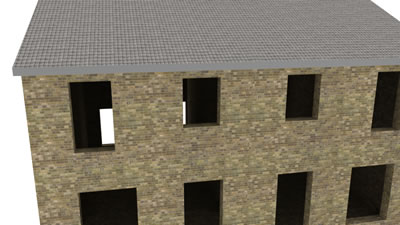
Textures display in SketchUp but do no render in Podium. Top 3 reasons.Imported images do not render or render black If you import images as images and not textures (SketchUp File--> Import), the images will not render or render black. You should either import the images as textures or explode the images after it is imported. Textures on reverse or back side faces There is an issue with textures that are assigned to the back side of a face and then are exposed in the model. Podium V2.x will some times render these textures inversely. To avoid this problem, make sure exposed faces are front side and not back side. How can you tell which face is front side and which is back side? There are a couple of ways to find out.
SketchUp has a nice tool that will turn off textures and display only the monochrome color of all the faces in the model. In SketchUp the normal or front side of a face is a light tan color and the back side is a darker, usually blue color. Using the monochrome icon in the Face Style tool bar, you can see which face is blue or back side. When you find the blue or back side faces, right click on them and use the Reverse Face option. You will have to reapply the texture to the front side face. The other method is to right click on the face and pick Entity Info. You will see two image panes in the Entity Info box. The left side is the front side. The right is the back side. Which side is the texture on? Textures assigned to groups If you have assigned textures to groups and not individual faces, sometimes the textures will fail to display in the Podium rendering. If this does happen, explode the group in question so that the texture does get mapped to each face in the group. You can then re-group the object in question. Black Rendered textures - several reasons
There are several reasons for black rendered textures.
SketchUp Materials that have a single letter name like "h" or "b"SketchUp material names that have a single letter name especially "h" and "b" are known to create problems. The material name "h" can crash Podium during processing scenes. A material with the single letter name "b" can change Podium camera angle t to be different from SketchUp's camera angle. These problems have been fixed in V2.5 Plus.
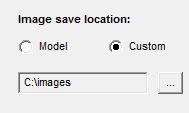
How can I save the rendered image into the folder I want?
If you are seeing a line in the Podium Render Manager (OOPR) that reads, Total Time 00:xx:xx, it means the image was finished and saved somewhere. As a default, the image is being saved in the "model" folder which is the same folder as where your SketchUp model is. If you want to change the folder where the image will be saved, use the Custom button in the Podium Options dialog box. Click on the Browse button to change folders. If you are still unable to save the rendered image to a folder this may be due to several reasons: There are some solutions to this issue. There are reported problems saving images in folders with names that are more than 32 characters, or very long path names or have special characters in the path name. This is a Windows only problem. SU Podium will ignore the folder name and save the image to the default SketchUp model folder location or to a temporary folder. Make sure your designated folder name has less that 32 characters in it. Also, try to minimize the path name and avoid using special characters in the path name. Look at item #1 above and use this technique if you can not save the rendered image. Changing light value in a light fixtures, omni grid and point lightsTo change the light power of any point/omni light, click on the light group in the model or use SketchUp's Outliner and select the light group. The light group will have a name such as <light-point-2#x>. Once the light group is selected, pick the Podium Light System icon from the SU Podium V2 tool bar. Change light values here. Keep in mind you can use decimals values for omnis such as .25. For the Omni Grid, find any one of the light groups using SketchUp's Outliner and change the light power and all the other light groups in the grid will update. Omni Grid consists of a main Group--->Individual Component-->Light Group. The components are instances of each other. Outliner is the best way to pick the light group in the Omni Grid. The light groups are nested within the main group, down 2 levels. When I select a material, it does not show in the Podium Material dialogIf you select a texture that is on a curved surface, the texture's name will not appear in Podium V2's Material dialog box. Select that specific material from SketchUp's Material browser (Windows) or use the SketchUp material selection (eyedropper) tool. This is true for textures that are on a back side (reverse side) of a SketchUp face as well. If you select the material in question by using the eyedropper or by selecting it from SketchUp's material browser (Windows only), the material will be displayed in the Podium Material dialog.
Quick way to control sun/sky brightness
One thing to keep in mind is SU Podium V2’s Physical Sky (in the Options/ Environment tab). As a default, Physical Sky is off but if it is on, it will simulate sky turbidity and depth. Podium will only render Physical Sky when it is turned on AND when SketchUp Shadows are on. When Physical Sky is on, the sun intensity and exposure sliders in the Environment dialog are the most effective way to change sun light. Changing the sun’s angle by changing SketchUp’s time of day is also effective. Your choice of SU Podium Presets will also effect sun/ sky brightness greatly. The default preset or default.pps is created with no specific environment in mind. It is the fastest preset. However, if you are rendering an outdoor or exterior scene, use one of the exterior presets. You will be able to control the sun and sky brightness more effectively. The interior preset is a very bright preset and is intended for interior scenes. If you use interior preset in an exterior scene which is using sun light, the rendering may look extremely bright and even look like white out. For more information about presets and for customized presets, please go to the Preset web page. Physical Sky has a sky color gradient that you can not control. The color will depend on the time of the day that your SketchUp shadows are set to. If you don’t like this effect and/ or want to have control of the sky color as well as additional control of sun light, do the following:
Two point perspective issues
Unknown Symbol message
Other known issues
© 2026 Cadalog, Inc. All Rights Reserved.
 |