
SU Podium excels at naturally lit interiors. Enclosed spaces provide a controlled lighting environment, and plenty of bounce-surfaces allow Podium's global illumination engine work its magic.
However, architectural visualization is far more than just naturally lit kitchens and living rooms. Podium is fully capable of producing beautiful exterior images, and with the right approach, beautiful night renders. Let's take a look at the process behind the above image.
When you open the Caretaker House model, you will see that there are six different scenes configured to fit a few common lighting situations. Click the Evening tab. This will move the camera to an exterior position and give us a base to start from, however there are several things we need to consider before we can start rendering.
Even though you're probably going to comp a starry sky into your image during post-processing, it is important to select an appropriate background style before rendering. In an exterior render, the color of the sky is used as a source of ambient/indirect illumination, so it will determine the overall tone of the image.
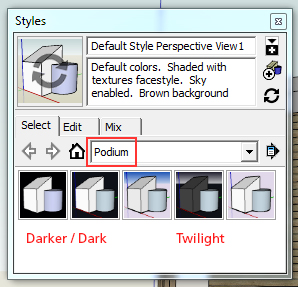 |
Open the Styles window, and select Podium from the dropdown list. Your Podium installation includes five SketchUp styles, three of which are useful for night rendering. Select Dark Night, Night_1, or Twilight (pictured left). Night_1 provides more illumination than the (essentially black) "Dark Night" setting, whereas the "Twilight" option uses a sky gradient to introduce subtle tonal variation to your image—any is perfectly usable for this situation. |
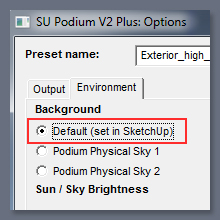 |
Very important! - Podium's two physical sky settings are fantastic when you need a blue sky and plenty of light, but they are not particularly suitable for night renders. Open up the Podium options dialog, and in the background section make sure you select default (set in SketchUp)! This will force Podium to use whatever background color you chose in the style editor when calculating the scene's ambient light. |
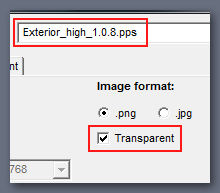 |
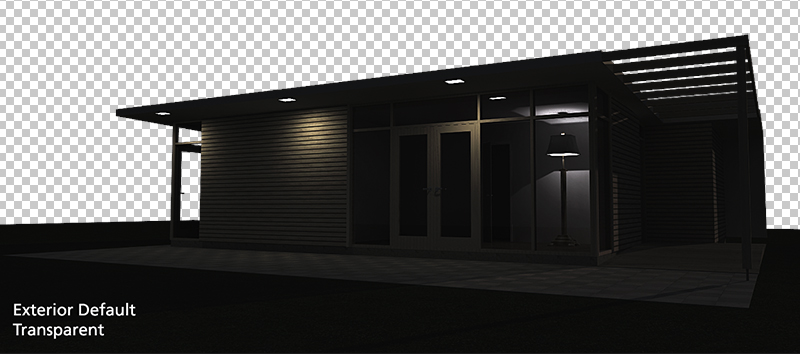
Presets: If you're working on a straightforward exterior shot, use the "exterior default" preset for testing, and "exterior high" for your final render. If you're rendering a structure with both interior and exterior features, make a test render with both the "interior default" and "exterior default" presets to determine which lighting solution is preferential. Transparency: If you are rendering with an image plane behind your model, this box can be ignored, however if you plan on compositing a background into your render (recommended), the transparent box must be checked. |
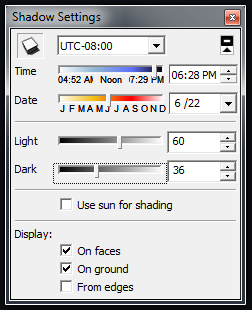 |
The easiest way to get a serviceable lighting solution is to simply turn on SketchUp shadows and work from there. This method was used in the image at the beginning of this article, and will give you a decent base with crisp, medium contrast shadows reminiscent of a clear night with a relatively full moon. One very nice perk of using SketchUp shadows is that you have access to the light and dark sliders in the shadows window. Even during a full moon, there is usually far less contrast between light and shadow than there would be on a sunny day at noon. You can simulate this effect by moving the light and dark sliders closer to one another—the difference will be subtle, but effective. However you do sacrifice some amount of control if you rely entirely on SketchUp shadows. |
|
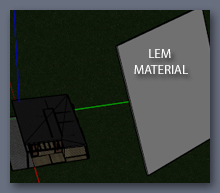
Use LEM materials: To exercise a greater level of control over your lighting, assign LEM materials to off-camera light planes. Using LEM lighting allows you to control the intensity and color of the light in your scene, and will reduce the edge contrast of your shadows, giving you a softer, more realistic result. Further Reading: For an in-depth explanation of night rendering using Podium LEM materials, click here. |
 | |
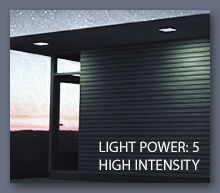
Accent lighting: One of the most important facets of night rendering is finding a good balance between light and dark to showcase the features of the model without over-exposing the shot. Because natural evening light is usually low-contrast, it can be quite beneficial to add some artificial lighting accents to your scene. In this case, all we did was increase the strength of the outdoor fixtures to a Light power of 5 and turn on the high intensity setting.. |
 |
Of course, this isn't a finished render. Night scenes usually require a touch more post processing than would normally be necessary. Since this was rendered with transparency, we obviously need to add a background image. This can be done in an external program like Photoshop, or within Podium using the Podium image editor (Read more here.)
PRODUCTS |
SOCIAL |
SUBSCRIBE |
CONTACT |
|
|
|