- SUPlugins Home Page
- Help Video Tutorial
- Forums
- FAQ and trouble shooting
- Operating SU Podium
- 1. Intro and Download
- 2. Install, Troubleshoot, Uninstall
- 3. Activate License
- 4. Render process and getting started
- 5. Download and samples to test
- 6. Where to get Support
- 7. What version do I have?
- 8. Check List to help Support.
- Options Menu
- Apply Material Properties
- Lights
- Render, OOPR, Preview
- Other items in the pull down menu
- Other Features and plugins
- 1. Podium Browser
- 2. Preset Editor
- 3. Omni Grid V2
- 4. Podium::Render script
- 5. RenderAll scenes
- 6. Podium Styles
- 7. Section_Tool
- 8. EditInPlace
- 9. PanoramaVR
- A summary of Tutorials
- SU Podium Books
- Software End User License Agreement
Options MenuClick here to watch the Introduction to V2 video which explains the user interface in detail.
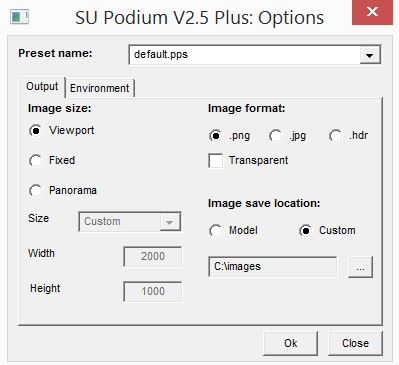
The Options menu has important settings that allow you to choose presets, set resolution size for the rendered image, choose an image file format (JPG/PNG/HDR), turn transparency on and off, where to save your rendered images, and various Environment settings such as Physical Sky vs SketchUp Sky, sun exposure and intensity, caustic, clay and soft omni lights.
1. Presets
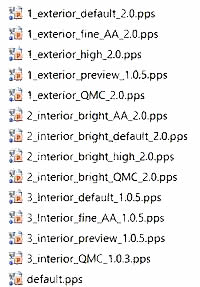
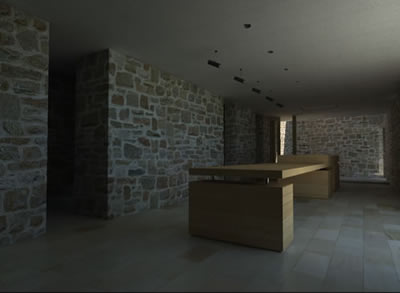
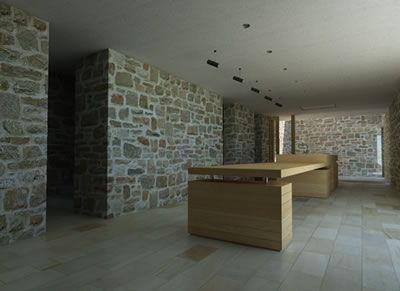
Presets are one of the most important choices you need to make before rendering a SketchUp scene. Look at the preset comparison page to see how each preset will vary depending on the interior or exterior environment, day light with sun, night light with no sun, or other lighting factors. There are three categories of presets that have been crafted for certain rendering environments. Presets were created to control hidden variables that effect things such as Physical Sky’s turbidity, sun brightness and contrast, ray trace bounces, amount of ambient light, tone mapping variables, anti-aliasing, etc. Hiding these variables makes the SU Podium user interface very simple. The categories of presets are 1_exterior_xx_2.0, 2_interior_ xx_bright_2.0 and 3_interior_1.0.x. Further, there is one preset that is not in a category which is default.pps. The fastest raytracing preset is non-category preset default.pps. However, the default preset has not been calibrated for exterior or interior environments. Default is a general purpose preset. 2.0 presets for V2.5.x The presets that are included in V2.5.x are different to the presets from V2 Plus and V2.5.00x. The updated presets have a version number of 2.0. There are subtle differences to the 1.0.x and the 2.0 presets. In general, the new presets are brighter, produce higher quality images. They have a more consistent illumination from one preset to another. But they are slightly slower than the 1.0 presets. Interior, Exterior, interior_bright presets have been crafted for the SketchUp Interior or Exterior environment. Interior would be defined as a model or scene that is indoors. Exterior would be primarily an outdoor environment. Interior_bright is for an interior scene and provides are brighter and consistent illumination throughout the scene. There are five types of presets per category. Default presets in each category are the most commonly used. The represent a balance of speed and quality. The QMC presets are the highest quality but will take the longest to render. They may take four times longer than the _default preset. QMC presets are good to get rid of blotches if you have a blotch problem. QMC presets are unbiased. See here about blotches. High presets are close to quality to QMC but biased and will take up to four to five times longer to render than _default preset. They are also very good in removing artifacts and blotches if other faster presets produce these. Read more about High and QMC in the Preset Guide blotches. Fine_AA presets have the same settings as the default with one exception, the anti-aliasing variable is increased. The result is an image in which edges are much more finely rendered than the other presets. The Preview presets minimize the resampling phase, and include very little anti-aliasing. Preview presets are are good for quick previews but not for final renderings to send to clients. (The interior.bright category does not have a Preview preset.) interior_bright_2.0 presets. Currently there are four types which include the default, high, fine_AA, QMC versions. The most widely used interior preset is the interior_bright_default.pps. The interior presets have increased levels of global illumination compared to exterior presets. The best use of the interior presets are with interior scenes. You will notice that interior presets expose a lot of light. Therefore experimenting with this preset category is important. Please read here on Tips for Interior Lighting and/or the Preset Guide. There are other interior light tutorials on the tutorial page. interior_1.0.x presets are presets used since SU Podium V2 Plus and were used in V2.5.00x. These presets are a little darker than the interior_bright and more importantly, with point lights in the model, they are faster. These presets are for use with interior scenes. As with interior_bright 2.0, there are four flavors of interior.bright presets: default, AA, high and QMC. There is also a preview preset which uses no anti-aliasing so is the fastest interior preset but the lowest quality. The main advantage of the interior_xxx_1.0.x over interior_bright are they render faster when there are a lot of point lights (omni lights) in the model. However, interior_bright have a more consistent light level for the scene. Below is a comparison between interior_default_1.05 and interior_bright_default_2.0
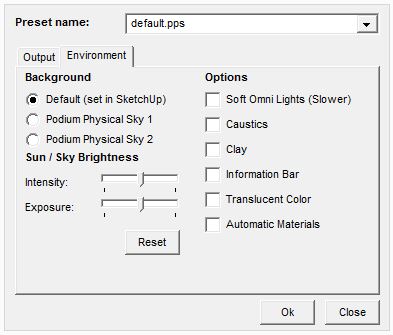
Exterior_2.0 presets. Exterior presets are made for exterior renderings. Exterior presets are highly recommended for exterior scenes that use sun and sky as a primary source for light. There are default, high, fine_AA, QMC and Preview types of Exterior presets. They function similarly as the interior presets only with less light intensity. You will notice if you use Exterior presets in an interior scene, it will produce a darker image. The reserve is true as well. But you can use Exterior presets for interior scenes if you have a lot of sunlight illuminating the interior. Exterior lighting is greatly effected by whether or not SketchUp Shadows and Physical Sky are on, how dark the background color of the SketchUp environment is, and the color of the textures. Please read the section below on items in the Environment tab to understand your various sky options. Also read about setting up your model for Exterior renderings here. Customizing Presets If you do desire to edit the presets, visit the the Preset Page. to read about how to use the Preset Editor. The presets are saved in the Preset folder in the SU Podium V2.x folder. Presets can be opened and edited using the Podium Preset Editor (PPE). This tool makes creating new presets much easier than using a text editor. Click here to read about the Preset Editor. Presets have a file extensions of .pps. This means that your Windows Explorer or Mac OS may confuse the preset file for a PowerPoint file. Make sure you open a preset with a text editor like Notepad or with the Preset Editor. Please take a look at this FAQ section for information on sun and sky brightness and how to best control this. Click Here. Preset Pre-release, Alternatives and past presets. Take a look at the Presets page to see what other presets are available for download. This page has the soon to be released, interior_brighter preset and alternatives as well as past version presets.
2. Resolution size, image formats and save
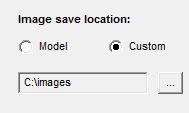
The full version will have Fixed sizes and Custom sizes for resolution. The trial version has limited resolution sizes. Viewport resolution means the rendered image is restricted to your SketchUp viewport resolution size. In other words, the image resolution will match the pixel size of your SketchUp viewport. For example, if you have a 1600 x 900 pixel computer screen and the SketchUp viewport is full screen, then your rendered image resolution will be close to 1600 X 900 pixels. Panorama. When you select Panorama in Options, the aspect ratio of Width to Height is automatically converted to a 2:1 ratio. You can change the Width pixel resolution but the Height will always be 50% of the width. This is because for panorama spheres the field of view is 360° X 180°. Any different aspect ratio will result in distorted final panoramic sphere. The panorama option will render an equirectangular image which you can convert to a spherical Panorama VR. Please read here. Fixed. The choice of resolutions sizes include Fixed sizes or custom sizes. Fixed sizes are 230x150, 640x480, 1024x768, 2048x1536, 3076x2304, 4076x3304, Wide screen resolutions of 16:9 aspect ratios of 852x480, 1600x900, 1920x1080. Custom sizes mean that you can enter any pixel height and width such as 8000 x 5000. Keep in mind that you should chose a resolution that matches the aspect ratio of your computer's monitor if you want the entire SketchUp viewport to be rendered. Format - Image file format SU Podium V2 Plus gives you the option to choose PNG/JPG/HDR as saved image formats. The Transparent option refers to Podium's ability to render to PNG file format with a transparent alpha channel. This allows you to add your own background in post-processing. Please see the Transparent section. HDR is not supported in the Podium Image Editor so please note this. You do not want to choose HDR if you plan to create Panoramas or use PIE in any way. Image Save Options - Where the rendered image is saved
By default, SU Podium V2.x will save the final rendered image to the same folder as where the SketchUp model is saved. However you can select Custom to save to a folder of your choice. After selecting custom, click on the Browse button to choose the folder on your computer you would like to save the final rendered images to. If you are having problems saving the rendered image to a custom folder, please read this FAQ item. Print to Paper There is no print feature in SU Podium. To print your rendered image, you need to use a image processing program such as Paint Shop or Photoshop. Click here to read about printing your image. 3. TransparentWith the PNG format on, Transparent will create rendered images with alpha transparent backgrounds so that you can easily add your own sky background image to rendered .png file in an image editor program. Click Here for more detail on Transparent backgrounds.
4. Environment settings
|
© 2026 Cadalog, Inc. All Rights Reserved.
